Pre-install Tasks
Apply BIOS updates and check settings
Before beginning the Qubes installation, make sure that your Qubes-compatible computer’s BIOS is updated to the latest available version. For more details about this process, see the section on Automatic BIOS Updates.
Once the BIOS is up-to-date, boot into the BIOS setup utility and update its settings. Note that not all BIOS versions will support the items listed, but if available following changes are recommended:
Ensure the internal clock is correct.
Set a password to access the BIOS (and record the password in your password manager).
Disable BIOS downgrades.
Enable Data Execution Prevention.
Enable virtualization support (required for Qubes OS). - for Intel-based devices, Intel VT-d and Intel VT-x should be enabled - for AMD-based devices, AMD-VI and AMD-V should be enabled
Disable unnecessary I/O options such as Wireless WAN and Bluetooth.
Disable unnecessary network options such as Wake-on-LAN and UEFI network stacks.
Disable Thunderbolt ports, or any other ports that allow Direct Memory Access (DMA).
Enable any physical tamper detection options.
Disable Computrace.
Disable SecureBoot.
If the Qubes hardware compatibility list entry for your computer recommends the use of Legacy Mode for boot, change that setting in the BIOS as well.
Download and verify Qubes OS
On the working computer, download the .iso and the Detached PGP signature for Qubes OS 4.3.1 from https://www.qubes-os.org/downloads/. The ISO is 8 GB approximately, and may take some time to download based on the speed of your Internet connection.
Follow the linked instructions to verify the ISO. Ensure that the ISO and hash values are in the same directory, then run:
gpg --keyserver-options no-self-sigs-only,no-import-clean --fetch-keys https://keys.qubes-os.org/keys/qubes-release-4.3-signing-key.asc
gpg -v --verify Qubes-R4.3.1-x86_64.iso.asc
The output should look like this:
gpg: requesting key from 'https://keys.qubes-os.org/keys/qubes-release-4.3-signing-key.asc'
gpg: key 1C3D9B627F3FADA4: 1 signature not checked due to a missing key
gpg: /home/user/.gnupg/trustdb.gpg: trustdb created
gpg: key 1C3D9B627F3FADA4: public key "Qubes OS Release 4.3 Signing Key" imported
gpg: Total number processed: 1
gpg:               imported: 1
gpg: no ultimately trusted keys found

gpg: enabled compatibility flags:
gpg: assuming signed data in 'Qubes-R4.3.1-x86_64.iso'
gpg: Signature made Wed Dec 17 23:33:45 2025 GMT
gpg:                using RSA key F3FA3F99D6281F7B3A3E5E871C3D9B627F3FADA4
gpg: using pgp trust model
gpg: Good signature from "Qubes OS Release 4.3 Signing Key" [unknown]
gpg: WARNING: This key is not certified with a trusted signature!
gpg:          There is no indication that the signature belongs to the owner.
Primary key fingerprint: F3FA 3F99 D628 1F7B 3A3E  5E87 1C3D 9B62 7F3F ADA4
gpg: binary signature, digest algorithm SHA512, key algorithm rsa4096
Specifically, you will want to make sure that you see “Good signature” listed in the text. If it does not report a good signature, try deleting the ISO and downloading it again.
Once you’ve verified the ISO, copy it to your installation medium - for example, if using Linux and a USB stick, using the command:
sudo dd if=Qubes-R4.3.1-x86_64.iso of=/dev/sdX bs=1048576 && sync
where if is set to the path to your downloaded ISO file and of is set to
the block device corresponding to your USB stick. Note that any data on the USB stick will be overwritten.
Caution
Make sure to verify that you have the correct device name using, for example, the lsblk command. You should write to the full device (eg. /dev/sdc) rather than to a partition (eg. /dev/sdc1).
Install Qubes OS (estimated wait time: 30-45 minutes)
Before starting the installation, please ensure that:
the computer is charging
all USB devices like YubiKeys, mice and keyboards are disconnected
To begin the Qubes installation, connect the Qubes install USB to your target computer and boot from it. You may need to bring up a boot menu at startup to do so - on Lenovo laptops, for example, you can do so by pressing F12 on boot.
Follow the installation documentation to install Qubes on your computer, ensuring that you:
Use English - United States as the setup language. (This requirement will be dropped in a future version).
Use all available storage space for the installation (as the computer should be dedicated to SecureDrop Workstation).
Set a strong full disk encryption (FDE) passphrase - a 6-word Diceware passphrase is recommended.
Create an administrative account named
userwith a strong password.
Note
Qubes is not intended to have multiple user accounts, so your account name and password will be shared by all SecureDrop Workstation users. The password will be required to log in and unlock the screen during sessions - choosing something strong but memorable and easily typed is recommended!
Once the installation is complete, you will be prompted to reboot into Qubes. Reboot, removing the install USB when the computer restarts.
You will be prompted to enter the FDE passphrase set during installation.
After the disk is unlocked and Qubes starts, you will be prompted to complete the initial setup. Click the Qubes OS icon.
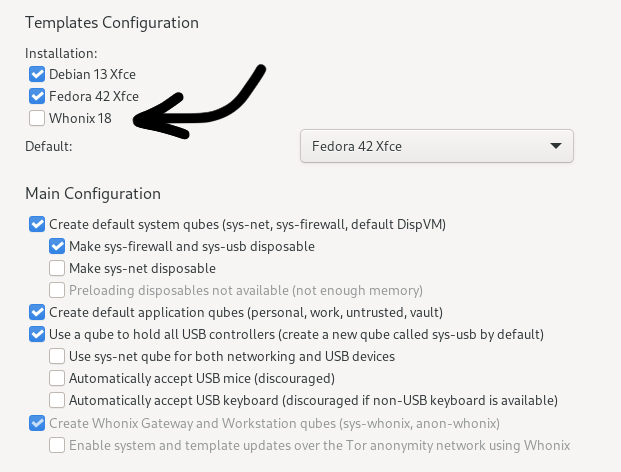
On the configuration screen, ensure that the following options are set:
Uncheck: “Whonix 18”
Dropdown: Default Template should be “Fedora 43 Xfce”
Check: “Create default system qubes (sys-net, sys-firewall, default DispVM)”
Check: “Make sys-firewall and sys-usb disposable”
If there is a grayed out option “USB qube configuration disabled”, make a note of this. An additional setup step will be required (see next section).
Note
Whonix is no longer needed by SecureDrop. However, if you have some use for Whonix, you can still install it if you want to. You can expect Whonix to incur additional maintenance.
If you do not have a specific need for Whonix, be sure to confirm that you have unchecked the Whonix option, as in this screenshot:
Finally, click Finish Configuration to set up the default system TemplateVMs and AppVMs.
Once the initial setup is complete, the login dialog will be displayed. Log in using the username and password set during installation.
(Hardware-dependent) Apply USB fixes
If, during the installation, you encountered the grayed out option “USB qube configuration disabled”, you must now create a VM to access your USB devices. If you did not encounter this issue, you can skip this section.
To create a USB qube, open a dom0 terminal via  ▸
▸  ▸ Other Tools ▸ Xfce Terminal.
Tip
For quicker access, you can add the dom0 terminal to the “Favorites” section of the
Qubes menu (identified by a bookmark symbol). Right-click the entry and select
Add to favorites. To remove it at a later time, right-click the entry in your
list of favorites and select Remove from favorites.
Run the following command:
sudo qubesctl state.sls qvm.sys-usb
After the command exits, confirm that you see an entry “Service: sys-usb” in the Qubes menu. If sys-usb is not running, you can start it with the command qvm-start sys-usb in dom0. Once sys-usb is running, click the devices widget in the upper right panel to expand a listing of all devices detected by Qubes OS.
Now, insert a safe USB device you intend to use with the SecureDrop Workstation. Click the devices widget again. Does the newly attached USB device appear in the list? If so, USB support is working and you can proceed with the installation. If you do encounter the error message “Denied qubes.InputKeyboard from sys-usb to dom0”, you need to additionally enable USB keyboard support:
sudo qubesctl state.sls qvm.usb-keyboard
While we recommend against the use of a USB keyboard for security reasons, this error can also occur in combination with other USB devices on some hardware.
Apply dom0 updates (estimated wait time: 15-30 minutes)
dom0 is the most trusted domain on Qubes OS, and has privileged access to all other VMs. As such, it is important to ensure that all available security updates have been applied to dom0 as the first step after the installation.
After logging in, use the network manager widget in the upper-right panel to configure your network connection.
Open a dom0 terminal from the Qubes Application menu (the icon in the upper left corner) by selecting ▸ (left-hand side) ▸ Other Tools ▸ Xfce Terminal. Run the following command:
sudo qubes-dom0-update -y
Wait for all updates to complete. If you encounter an error during this stage, please contact us for assistance, as it may not be safe to proceed with the installation.
After updating dom0, reboot the workstation to ensure that all updates have taken effect for your active session.
Apply updates to system templates (estimated wait time: 45-60 minutes)
After logging in again, confirm that the network manager successfully connects you to the configured network. If necessary, verify the network settings using the network manager widget.
Once connected, launch the Qubes Update tool via ▸ Qubes Tools ▸ Qubes Update to update the system VMs. in the [Dom0] Qubes Update window, check all entries in the list above except for dom0 (which you have already updated in the previous step). Then, click Update. The system’s VMs will be updated sequentially - this may take some time. When the updates are complete, click Next. You will then be prompted to Finish and restart/shutdown 4 qubes. Go ahead and do so, and allow time for them to restart.