Installing SecureDrop Workstation
Download SecureDrop Workstation Packages
First, you must configure the Qubes-Contrib repo, then download the SecureDrop Workstation packages.
Make sure that network connection is enabled using the network manager widget in the upper right panel.
Next, in a
dom0terminal ( ▸
▸  ▸ Other ▸ Xfce Terminal):
sudo qubes-dom0-update -y qubes-repo-contrib
sudo qubes-dom0-update --clean -y securedrop-workstation-keyring
The SecureDrop Relase keyring will be installed on your machine. Wait 15 seconds for the key to be imported into the
rpmdatabase. Then:sudo qubes-dom0-update --clean -y securedrop-workstation-dom0-config sudo dnf -y remove qubes-repo-contrib
Configure SecureDrop Workstation
Now you can proceed with configuring the SecureDrop Workstation with the correct Journalist Interface details and submission private key.
Import Submission Private Key
In order to decrypt submissions, you will need a copy of the Submission Private Key from your SecureDrop instance’s Secure Viewing Station.
To protect this key and preserve the air gap, you will need to connect the SVS USB to a Qubes VM with no network access, and copy it from there to dom0. You cannot directly copy and paste to the dom0 VM from another VM - instead, follow the steps below:
First, use the network manager widget in the upper right panel to disable your network connection. These instructions refer to the
vaultVM, which has no network access by default, but if the SVS USB is attached to another VM by mistake, this will offer some protection against exfiltration.Next, choose
▸ Apps ▸ vault ▸ Thunar File Manager to open the file manager in the vaultVM.Connect the SVS USB to a USB port on the Qubes computer, then use the devices widget in the upper right panel to attach it to the
vaultVM. There will be three entries for the USB in the section titled Data (Block) Devices. Choose the unlabeled entry (not the one labeled “TAILS”) annotated with asys-usbtext that ends with a number, likesys-usb:sdb2. That is the persistent volume.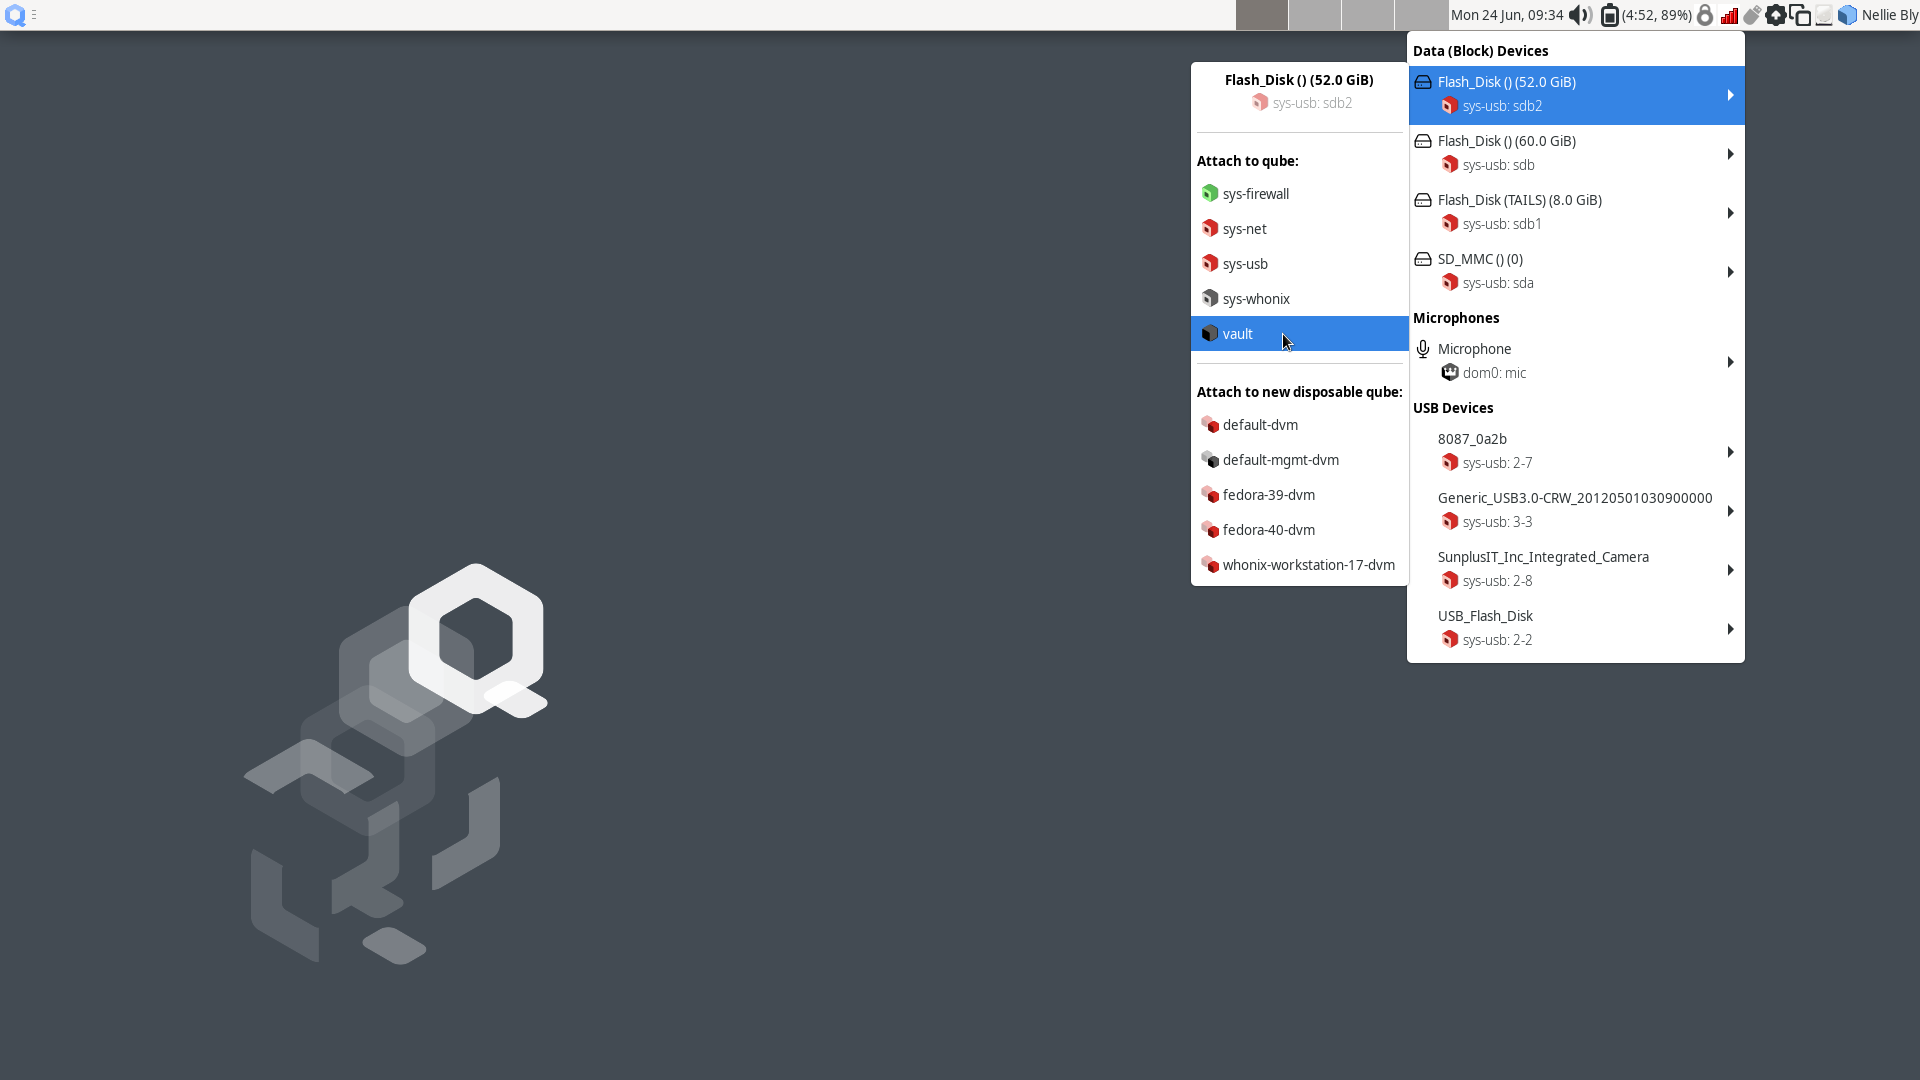
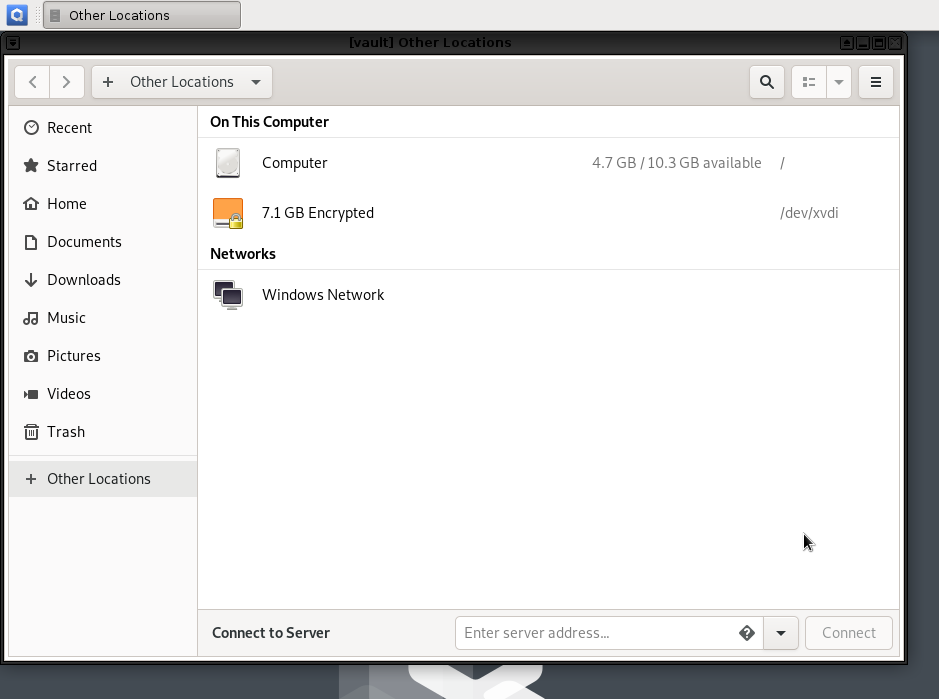
In the the
vaultfile manager, select the persistent volume’s listing in the lower left sidebar. It will be namedN GB encrypted, where N is the size of the persistent volume. Enter the SVS persistent volume passphrase to unlock and mount it. When asked if you would like to forget the password immediately or remember it until you logout, choose the option to Forget password immediately.Note
You will receive a message that says Failed to open directory “TailsData”. This is normal behavior and will not cause any issues with the subsequent steps.
Open a
dom0terminal via ▸ ▸ Other ▸ Xfce Terminal. Once the terminal window opens, run the following command to import the submission key:sdw-admin --configureFollow the command prompts to complete submission key import.
Note
If there are multiple keys present on the device,
sdw-admin --configurewill print the fingerprints of those keys for you to select which to use as the submission private key. You can open<source interface address>.onion/metadatain Tor Browser on another network-connected computer to check the correct key fingerprint used by your SecureDrop instance.Once the submission key import is complete, in the
vaultfile manager, right-click on the TailsData sidebar entry, then select Unmount and disconnect the SVS USB.If you were prompted for a passphrase during import, you will now need to remove the passphrase on
sd-journalist.sec. See Removing the Passphrase from a GPG Key.
Import Journalist Interface details
SecureDrop Workstation connects to your SecureDrop instance’s API via the Journalist Interface. In order to do so, it will need the Journalist Interface address and authentication info. As the clipboard from another VM cannot be copied into dom0 directly, follow these steps to copy the file into place:
Locate an Admin Workstation or Journalist Workstation USB drive. Both hold the address and authentication info for the Journalist Interface; if you also want to copy the journalist user’s password database, use the Journalist Workstation USB drive.
Connect the USB drive to a USB port on the Qubes computer, then use the devices widget in the upper right panel to attach it to the
vaultVM. There will be 3 listings for the USB in the widget: one for the base USB, one for the Tails partition on the USB, labeledTails, and a 3rd unlabeled listing, for the persistent volume. Choose the third listing.In the the
vaultfile manager, select the persistent volume’s listing in the lower left sidebar. It will be namedN GB encrypted, where N is the size of the persistent volume. Enter the persistent volume passphrase to unlock and mount it. When prompted, select the option to Forget password immediately.In the
dom0terminal, proceed with the next import step of thesdw-admincommand or re-runsdw-admin --configureThe command will print out the imported Journalist Interface details to confirm before proceeding.
If you used an Admin Workstation USB drive, or you don’t intend to copy a password database to this workstation, safely disconnect the USB drive now. In the
vaultfile manager, right-click on the TailsData sidebar entry, then select Unmount and disconnect the USB drive.
Copy SecureDrop login credentials
Users of SecureDrop Workstation must enter their username, passphrase and two-factor code to connect with the SecureDrop server. You can manage these passphrases using the KeePassXC password manager in the vault VM. If this laptop will be used by more than one journalist, we recommend that you shut down the vault VM now (using the Qube widget in the upper right panel), skip this section, and use a smartphone password manager instead.
In order to set up KeePassXC for easy use:
Add KeePassXC to the application menu by selecting it from the list of available apps in
▸ Apps ▸ vault ▸ Settings ▸ Applications and pressing the button labeled > (do not press the button labeled >>, which will add all applications to the menu).Launch KeePassXC via
▸ Apps ▸ vault ▸ KeePassXC. When prompted to enable automatic updates, decline. vaultis networkless, so the built-in update check will fail; the app will be updated through system updates instead.Close the application.
Important
The Admin Workstation password database contains sensitive credentials not required by journalist users. Make sure to copy the credentials from the Journalist Workstation USB.
In order to copy a journalist’s login credentials:
If a Journalist Workstation USB is not currently attached, connect it, attach it to the
vaultVM, open it in the file manager, and enter its encryption passphrase.Locate the password database. It should be in the
Persistentdirectory, and will typically be namedkeepassx.kdbxor similar.Open a second
vaultfile manager window (Ctrl + N in the current window) and navigate to the Home directory.Drag and drop the password database to copy it.
In the
vaultfile manager, right-click on the TailsData sidebar entry, then select Unmount and disconnect the Journalist Workstation USB. Close this file manager window.In the file manager window that displays the home directory, open the copy you made of the password database by double-clicking it.
If the database is passwordless, KeePassXC may display a security warning when opening it. To preserve convenient passwordless access, you can protect the database using a key file, via Database ▸ Database settings ▸ Security ▸ Add additional protection ▸ Add Key File ▸ Generate. This key file has to be selected when you open the database, but KeePassXC will remember the last selection.
Inspect each section of the password database to ensure that it contains only the information required by the journalist user to log in.
Close the application window and shut down the
vaultVM (using the Qube widget in the upper right panel). At this time, you can also re-enable the network connection using the network manager widget.
Install SecureDrop Workstation (estimated wait time: 60-90 minutes)
Configure infinite scrollback for your terminal via Edit ▸ Preferences ▸ General ▸ Unlimited scrollback. This helps to ensure that you will be able to review any error output printed to the terminal during the installation.
Finally, in the
dom0terminal, run the command:sdw-admin --apply
This command will take a considerable amount of time and approximately 4GB of bandwidth, as it sets up multiple VMs and installs supporting packages. When the command finishes, reboot the machine to complete the installation. Your SecureDrop Workstation is finally ready to use!
Test the Workstation
The preflight updater will start automatically after logging into the system. Please follow the preflight updater’s instructions.
Note
If you close the SecureDrop Inbox during your session, you can launch it again using the SecureDrop icon on the desktop.
Once the update check is complete, SecureDrop Inbox will launch. Log in using an existing journalist account and verify that sources are listed and submissions can be downloaded, decrypted, and viewed.
Enable password copy and paste
If you use KeePassXC in the vault VM to manage login credentials, you can enable the user to copy passwords to the SecureDrop Inbox using inter-VM copy and paste. While this is relatively safe, we recommend reviewing the section Managing Clipboard Access of this guide, which goes into further detail on the security considerations for inter-VM copy and paste.
The password manager runs in the networkless vault VM, and the SecureDrop Inbox runs in the sd-app VM. To permit this one-directional clipboard use, issue the following command in dom0:
qvm-tags vault add sd-send-app-clipboard
Confirm that the tag was correctly applied using the ls subcommand:
qvm-tags vault ls
To revoke this configuration change later or correct a typo, you can use the del subcommand, e.g.:
qvm-tags vault del sd-send-app-clipboard